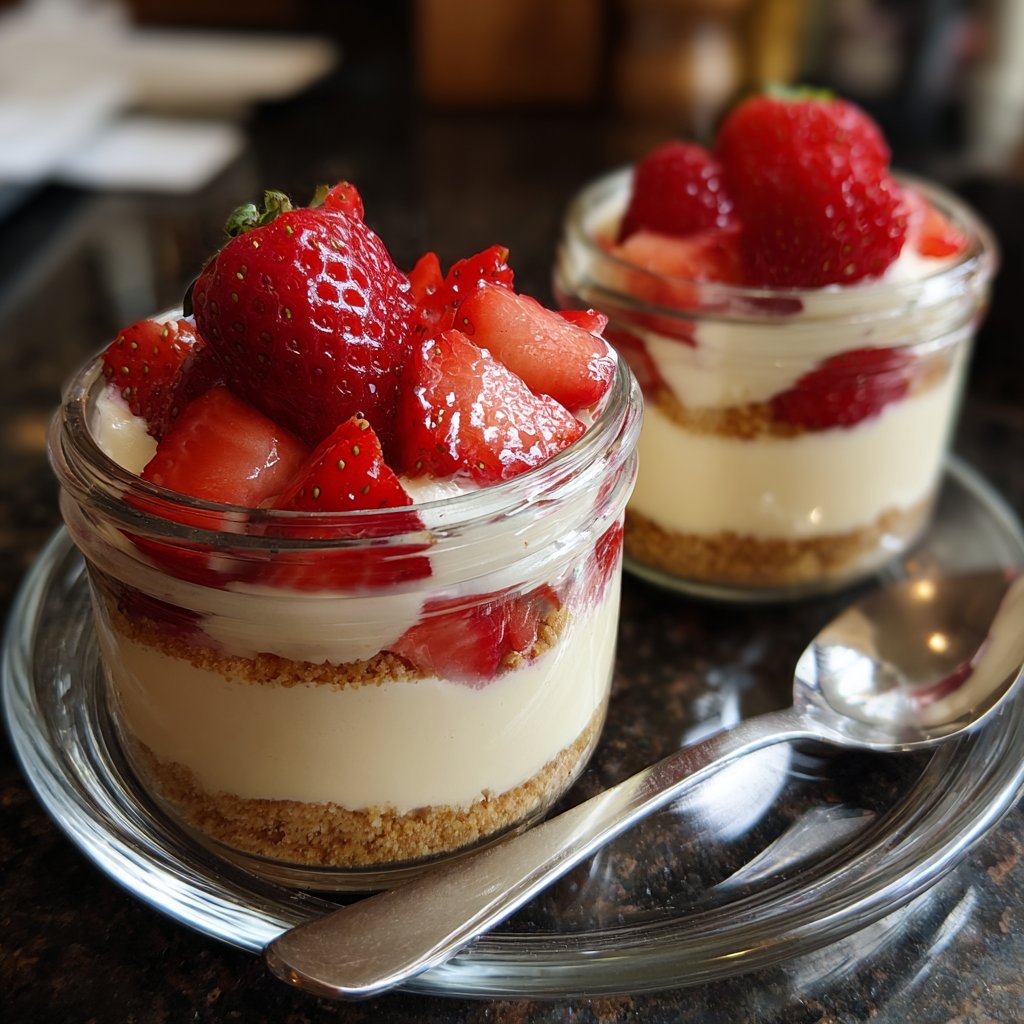
No Bake Strawberry Cheesecake Jars
Highlighted under: Sugar Rush Kitchen
I absolutely love making No Bake Strawberry Cheesecake Jars, especially on warm days when a classic cheesecake feels too heavy. These little treats offer a refreshing twist with layers of creamy cheesecake infused with fresh strawberries. The best part? They come together in minutes and require no oven! Whenever I prepare these jars for gatherings, they're always a hit, and it's a joy to see friends' faces light up with the first spoonful. Trust me, once you try this recipe, it will become a staple for every occasion.
When I first wanted to create a quick dessert, I decided to experiment with No Bake Strawberry Cheesecake Jars. I was pleasantly surprised by how easily the ingredients came together and how delicious the end result was. The sweetness of the strawberries perfectly complements the creamy filling, creating a delightful balance of flavors.
To ensure the cheesecake filling maintains its rich taste without baking, I used cream cheese and whipped cream, which combined beautifully. A tip I always share is to chill the jars for just a bit before serving; this enhances the flavors and ensures a satisfying texture in every bite!

Why You'll Love This Recipe
- Refreshing and light dessert perfect for warm weather
- Easy to prepare with no baking required
- Layers of creamy cheesecake and fresh strawberries for a delightful contrast
Crust Mastery
Creating the perfect crust is key to achieving a delightful texture in your No Bake Strawberry Cheesecake Jars. When mixing the graham cracker crumbs with melted butter, aim for a sandy consistency that clumps together when pressed. Use a glass or a small measuring cup to press it firmly into the bottom of the jars, ensuring there are no gaps. This step not only adds flavor but provides a contrasting crunch to the creamy filling.
If you want to switch things up, consider substituting the graham crackers with crushed Oreos or digestive biscuits for a different flavor profile. Just remember that different cookies may alter the sweetness level, so adjust the powdered sugar accordingly when preparing the cheesecake filling.
Perfecting the Cheesecake Filling
For a smooth and creamy cheesecake filling, it's crucial to let the cream cheese reach room temperature before mixing. Cold cream cheese can result in a lumpy texture, which is less than ideal. Beat it until glossy and smooth before gradually incorporating the powdered sugar to prevent clumps. This step is essential to achieving that silky mouthfeel that makes each spoonful irresistible.
Whipping the heavy cream to soft peaks should be done with care. Avoid over-whipping, which can lead to a grainy texture. The cream should hold its shape but still be fluid enough to fold easily into the cream cheese mixture. This delicate balance results in a light and airy dessert that melts in your mouth.
Layering Techniques for Visual Appeal
Layering your ingredients thoughtfully adds both visual and textural appeal to each jar. Start with a even layer of cheesecake filling, then gently press down the sliced strawberries to ensure they stay in place. I like to alternate the layers for a beautiful presentation, allowing the vibrant strawberries to peek through the transparent jar for a stunning effect. Topping the jar with a final layer of cheesecake filling creates a lovely blank canvas for the garnish.
When garnishing, consider drizzling a bit of strawberry puree over the top or adding a dollop of whipped cream for an extra indulgent touch. Fresh mint leaves also make for a beautiful garnish and add a hint of freshness that complements the strawberries perfectly. These small details can elevate your dessert presentation, making it feel special.
Ingredients
Gather the following ingredients to create your No Bake Strawberry Cheesecake Jars:
Ingredients
- 1 cup graham cracker crumbs
- 4 tablespoons melted butter
- 2 cups cream cheese, softened
- 1 cup powdered sugar
- 1 teaspoon vanilla extract
- 1 cup heavy whipping cream
- 2 cups fresh strawberries, sliced
- Extra strawberries for garnish
Once you have everything ready, you're set to start layering your delicious cheesecake jars!
Instructions
Follow these simple steps to create your No Bake Strawberry Cheesecake Jars:
Prepare the crust
In a mixing bowl, combine the graham cracker crumbs and melted butter. Mix until the crumbs are evenly coated. Press the mixture firmly into the bottom of each jar to form a crust layer.
Make the cheesecake filling
In another bowl, beat the cream cheese until smooth. Gradually add the powdered sugar and vanilla extract, mixing until fully incorporated. In a separate bowl, whip the heavy cream until soft peaks form, then gently fold it into the cream cheese mixture until smooth.
Layer the jars
Spoon a layer of the cheesecake filling over the crust in each jar. Add a layer of sliced strawberries, then repeat the layers until the jars are filled, finishing with the cheesecake filling on top.
Chill and serve
Cover the jars with lids or plastic wrap and refrigerate for at least 1 hour before serving. Garnish with extra strawberries on top just before enjoying.
Enjoy your refreshing No Bake Strawberry Cheesecake Jars!
Pro Tips
- For best results, use fresh strawberries and let the jars chill for a little longer if you have time. You can also add a drizzle of strawberry sauce on top for an extra sweet touch.
Make-Ahead Tips
One of the best aspects of No Bake Strawberry Cheesecake Jars is their make-ahead potential. You can prepare the cheesecake filling and crust up to 24 hours in advance. Simply layer them in the jars and refrigerate until ready to serve. This not only saves time on the day you plan to entertain but also allows the flavors to meld beautifully, enhancing the overall taste of the dessert.
If you want to keep it fresh throughout the week, consider storing the prepared jars without strawberries. Add the fresh fruit just before serving to maintain their optimal texture and flavor. This simple step ensures that your cheesecake jars stay looking and tasting their best.
Storage Solutions
These cheesecake jars can be stored in the refrigerator for up to three days. If you’ve got leftovers, make sure to cover them tightly with lids or plastic wrap to prevent drying out. For longer storage, you can freeze the cheesecake mixture (without the strawberries) in an airtight container for up to a month. When you’re ready to enjoy them, simply thaw in the refrigerator overnight before layering with fresh strawberries.
Remember that while freezing isn’t usually recommended for whipped cream, the cheesecake filling can hold up well. Just whisk it back to a creamy texture if it seems a bit firm after thawing, and then layer it into your jars with strawberries for a delightful treat.
Questions About Recipes
→ Can I use frozen strawberries?
Yes, you can use frozen strawberries, but make sure to thaw and drain them well before using to avoid excess moisture.
→ How long can I store these jars?
They can be stored in the refrigerator for up to 3 days, making them a great make-ahead dessert.
→ Can I substitute the cream cheese?
Yes, for a lighter option, you can use Greek yogurt or mascarpone cheese, though the flavor will change slightly.
→ What can I use instead of graham crackers?
You can use crushed cookies like digestive biscuits, Oreos, or even nut-based crusts for a gluten-free option.
No Bake Strawberry Cheesecake Jars
What You'll Need
Ingredients
- 1 cup graham cracker crumbs
- 4 tablespoons melted butter
- 2 cups cream cheese, softened
- 1 cup powdered sugar
- 1 teaspoon vanilla extract
- 1 cup heavy whipping cream
- 2 cups fresh strawberries, sliced
- Extra strawberries for garnish
How-To Steps
In a mixing bowl, combine the graham cracker crumbs and melted butter. Mix until the crumbs are evenly coated. Press the mixture firmly into the bottom of each jar to form a crust layer.
In another bowl, beat the cream cheese until smooth. Gradually add the powdered sugar and vanilla extract, mixing until fully incorporated. In a separate bowl, whip the heavy cream until soft peaks form, then gently fold it into the cream cheese mixture until smooth.
Spoon a layer of the cheesecake filling over the crust in each jar. Add a layer of sliced strawberries, then repeat the layers until the jars are filled, finishing with the cheesecake filling on top.
Cover the jars with lids or plastic wrap and refrigerate for at least 1 hour before serving. Garnish with extra strawberries on top just before enjoying.
Extra Tips
- For best results, use fresh strawberries and let the jars chill for a little longer if you have time. You can also add a drizzle of strawberry sauce on top for an extra sweet touch.
Nutritional Breakdown (Per Serving)
- Calories: 380 kcal
- Total Fat: 26g
- Saturated Fat: 15g
- Cholesterol: 195mg
- Sodium: 85mg
- Total Carbohydrates: 32g
- Dietary Fiber: 3g
- Sugars: 24g
- Protein: 6g